Deck & Outdoor Remodeling

Landscape and Outdoor Lighting Installation for Bellevue Homes


Outdoor lighting is the one exterior upgrade you use every evening from October through April. We design and install low-voltage landscape, path, and deck lighting built for the wet Puget Sound climate, with corrosion-resistant fixtures and sealed direct-burial connections. Every beam gets aimed at night, on site.

  • Low-voltage system design
  • Path and step lighting
  • Tree uplighting and moonlighting
  • Timers and smart controls
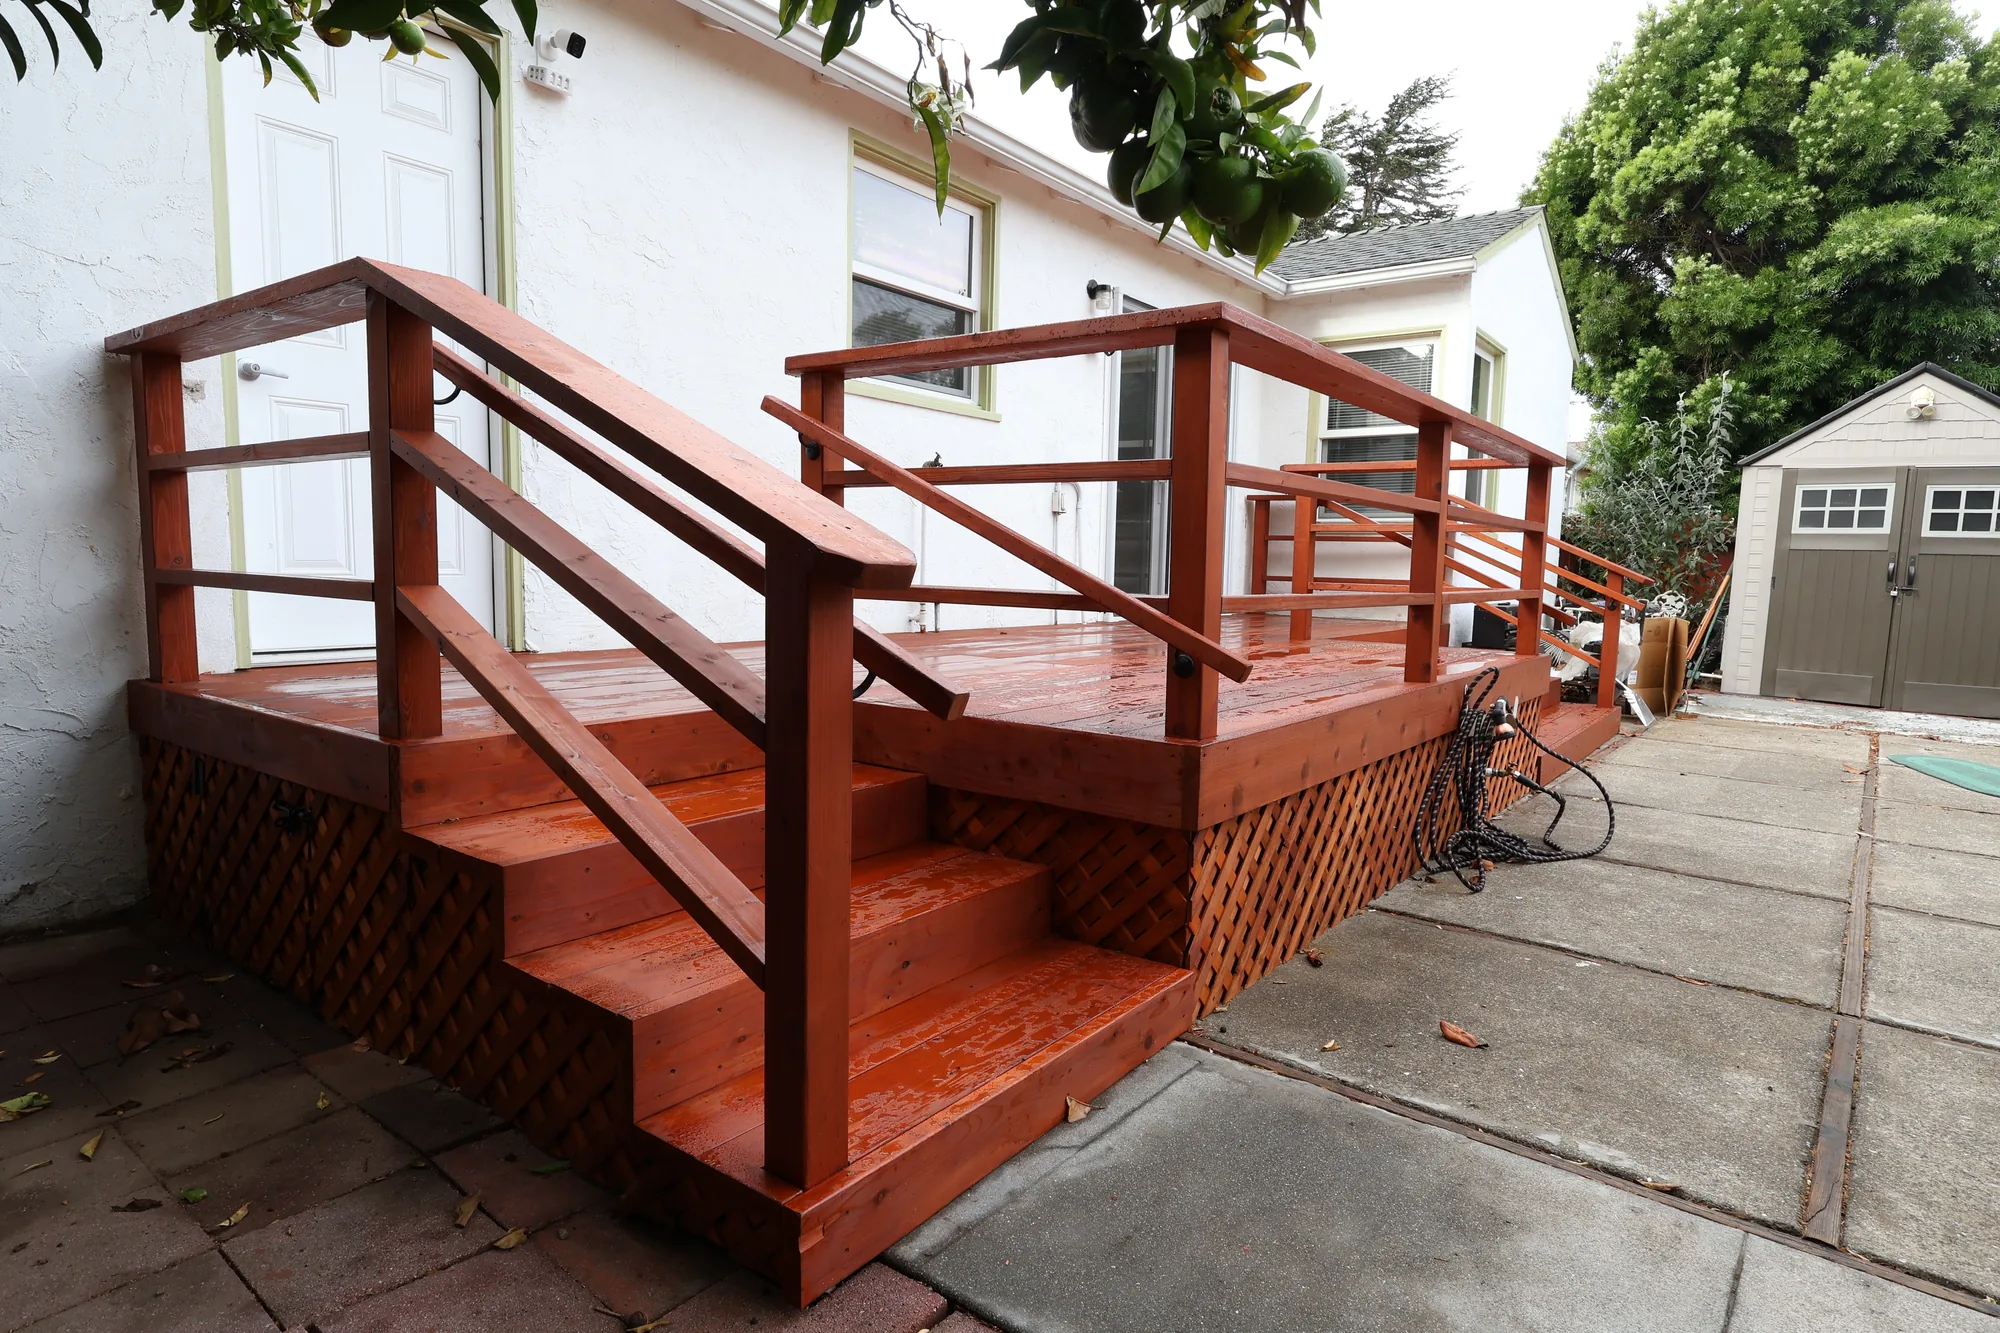
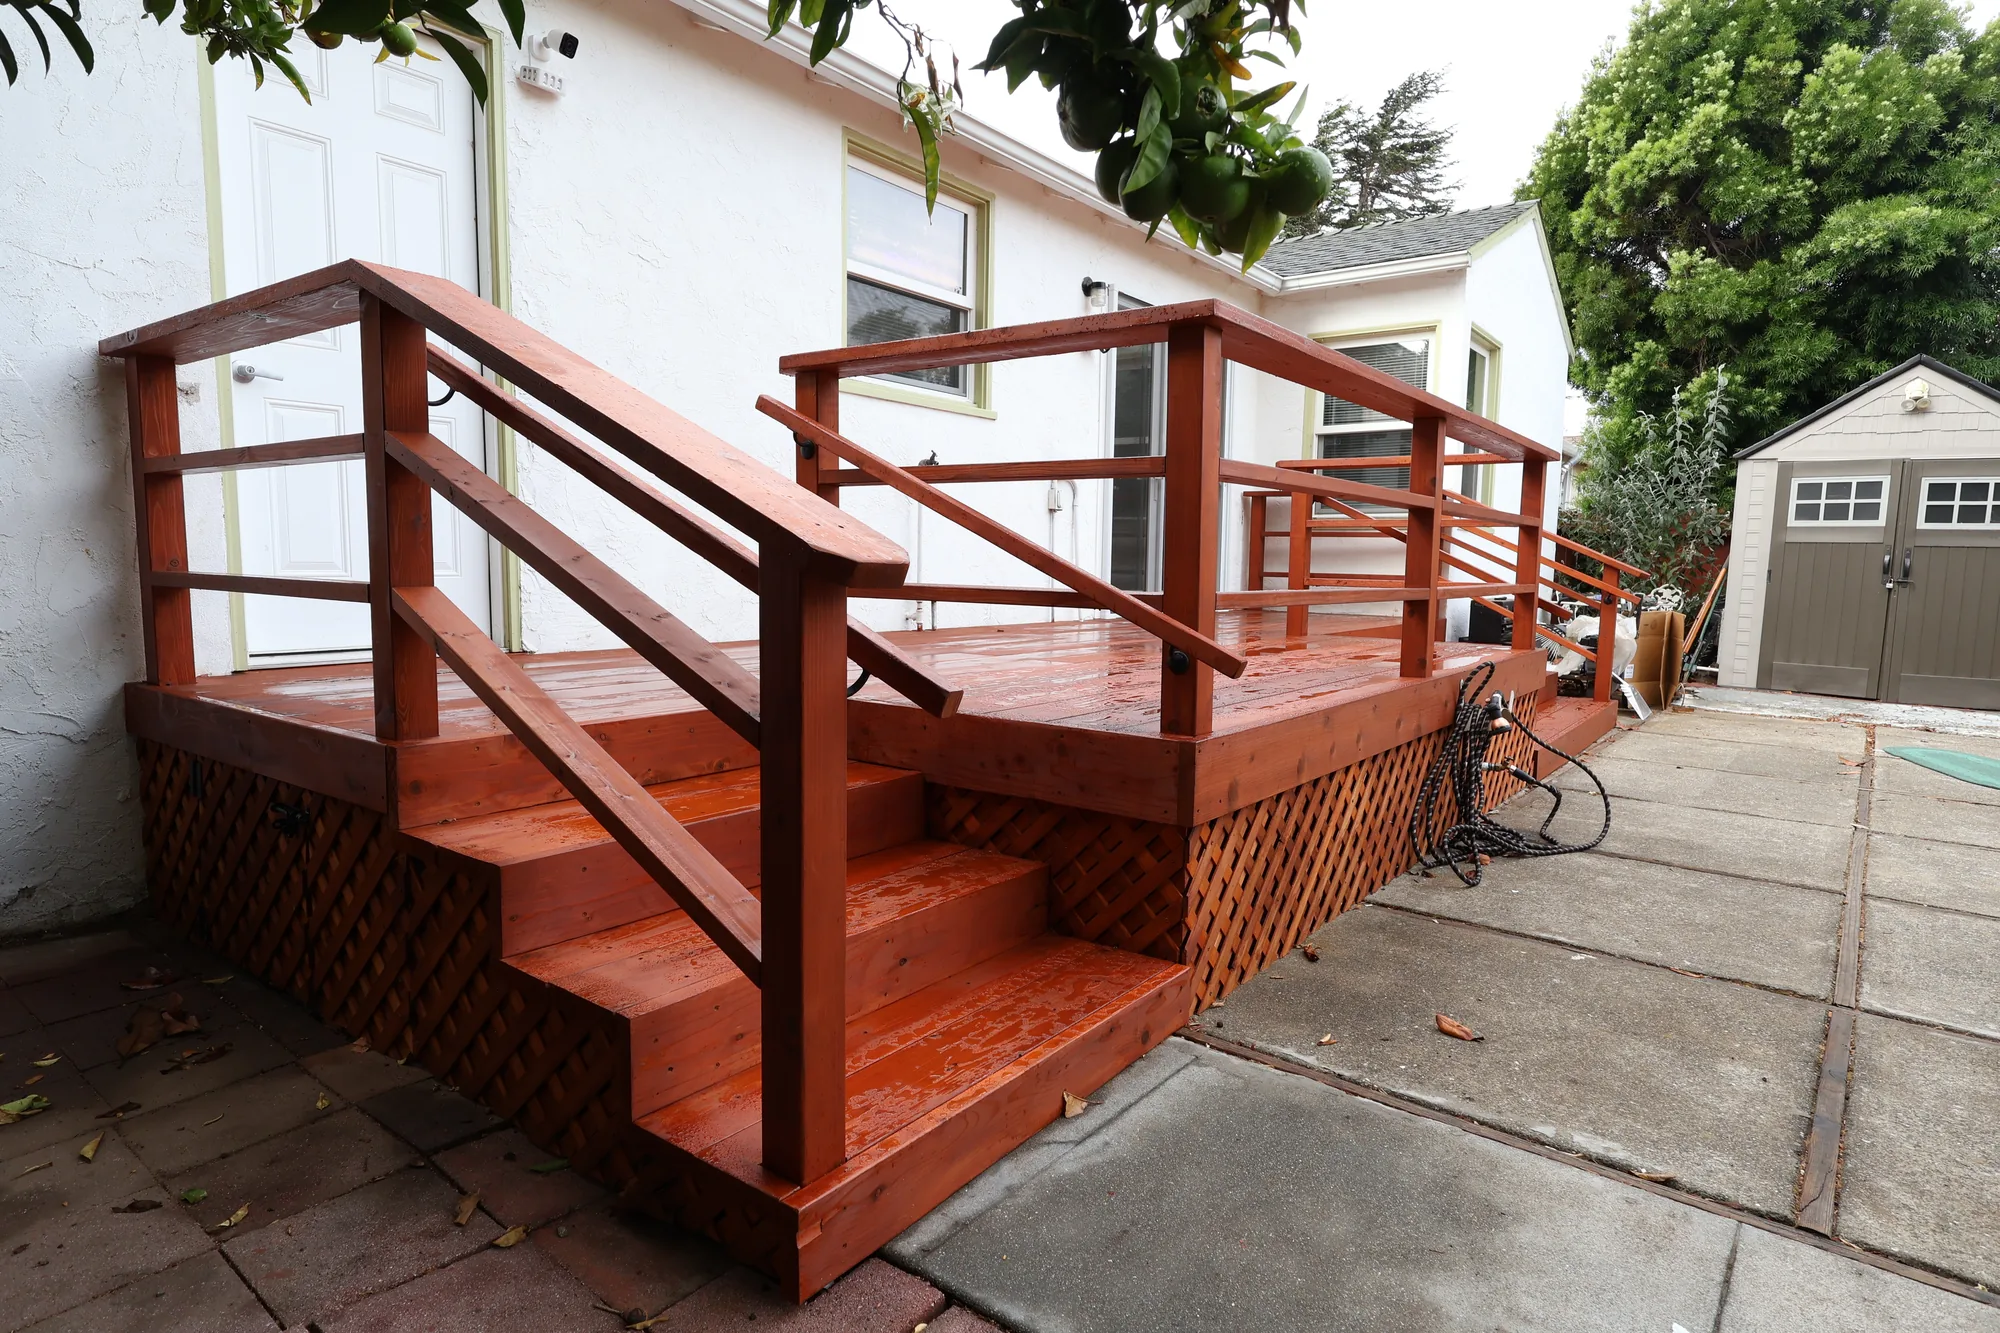
Angled view of a low wood deck showing wide stairs, horizontal rail infill and diagonal lattice skirting.
Overview

Why Evening Light Matters More Here


At this latitude the sun is down before 4:30 in December and stays down past seven in the morning. For half the year, the version of your property you actually look at is the lit version.

Outdoor lighting is also the exterior trade we are most often called in to repair. The pattern is predictable: hardware-store aluminum fixtures, cheap crimp connectors buried loose in soil, one long daisy chain off a single transformer. Two winters later the far end is dim from voltage drop, the connections have wicked water, and the housings have corroded through at the ground line.

We treat it as an electrical and moisture problem first: correct wire gauge for the actual run length, transformer taps chosen to land every fixture in its usable voltage window, waterproof direct-burial connections, and housings rated for constant soil contact. Once the system will survive, we spend the aiming time to make it look intentional rather than like a runway.

Completed Project

Warm-Stained Wood Deck with Horizontal Rail and Lattice Skirt


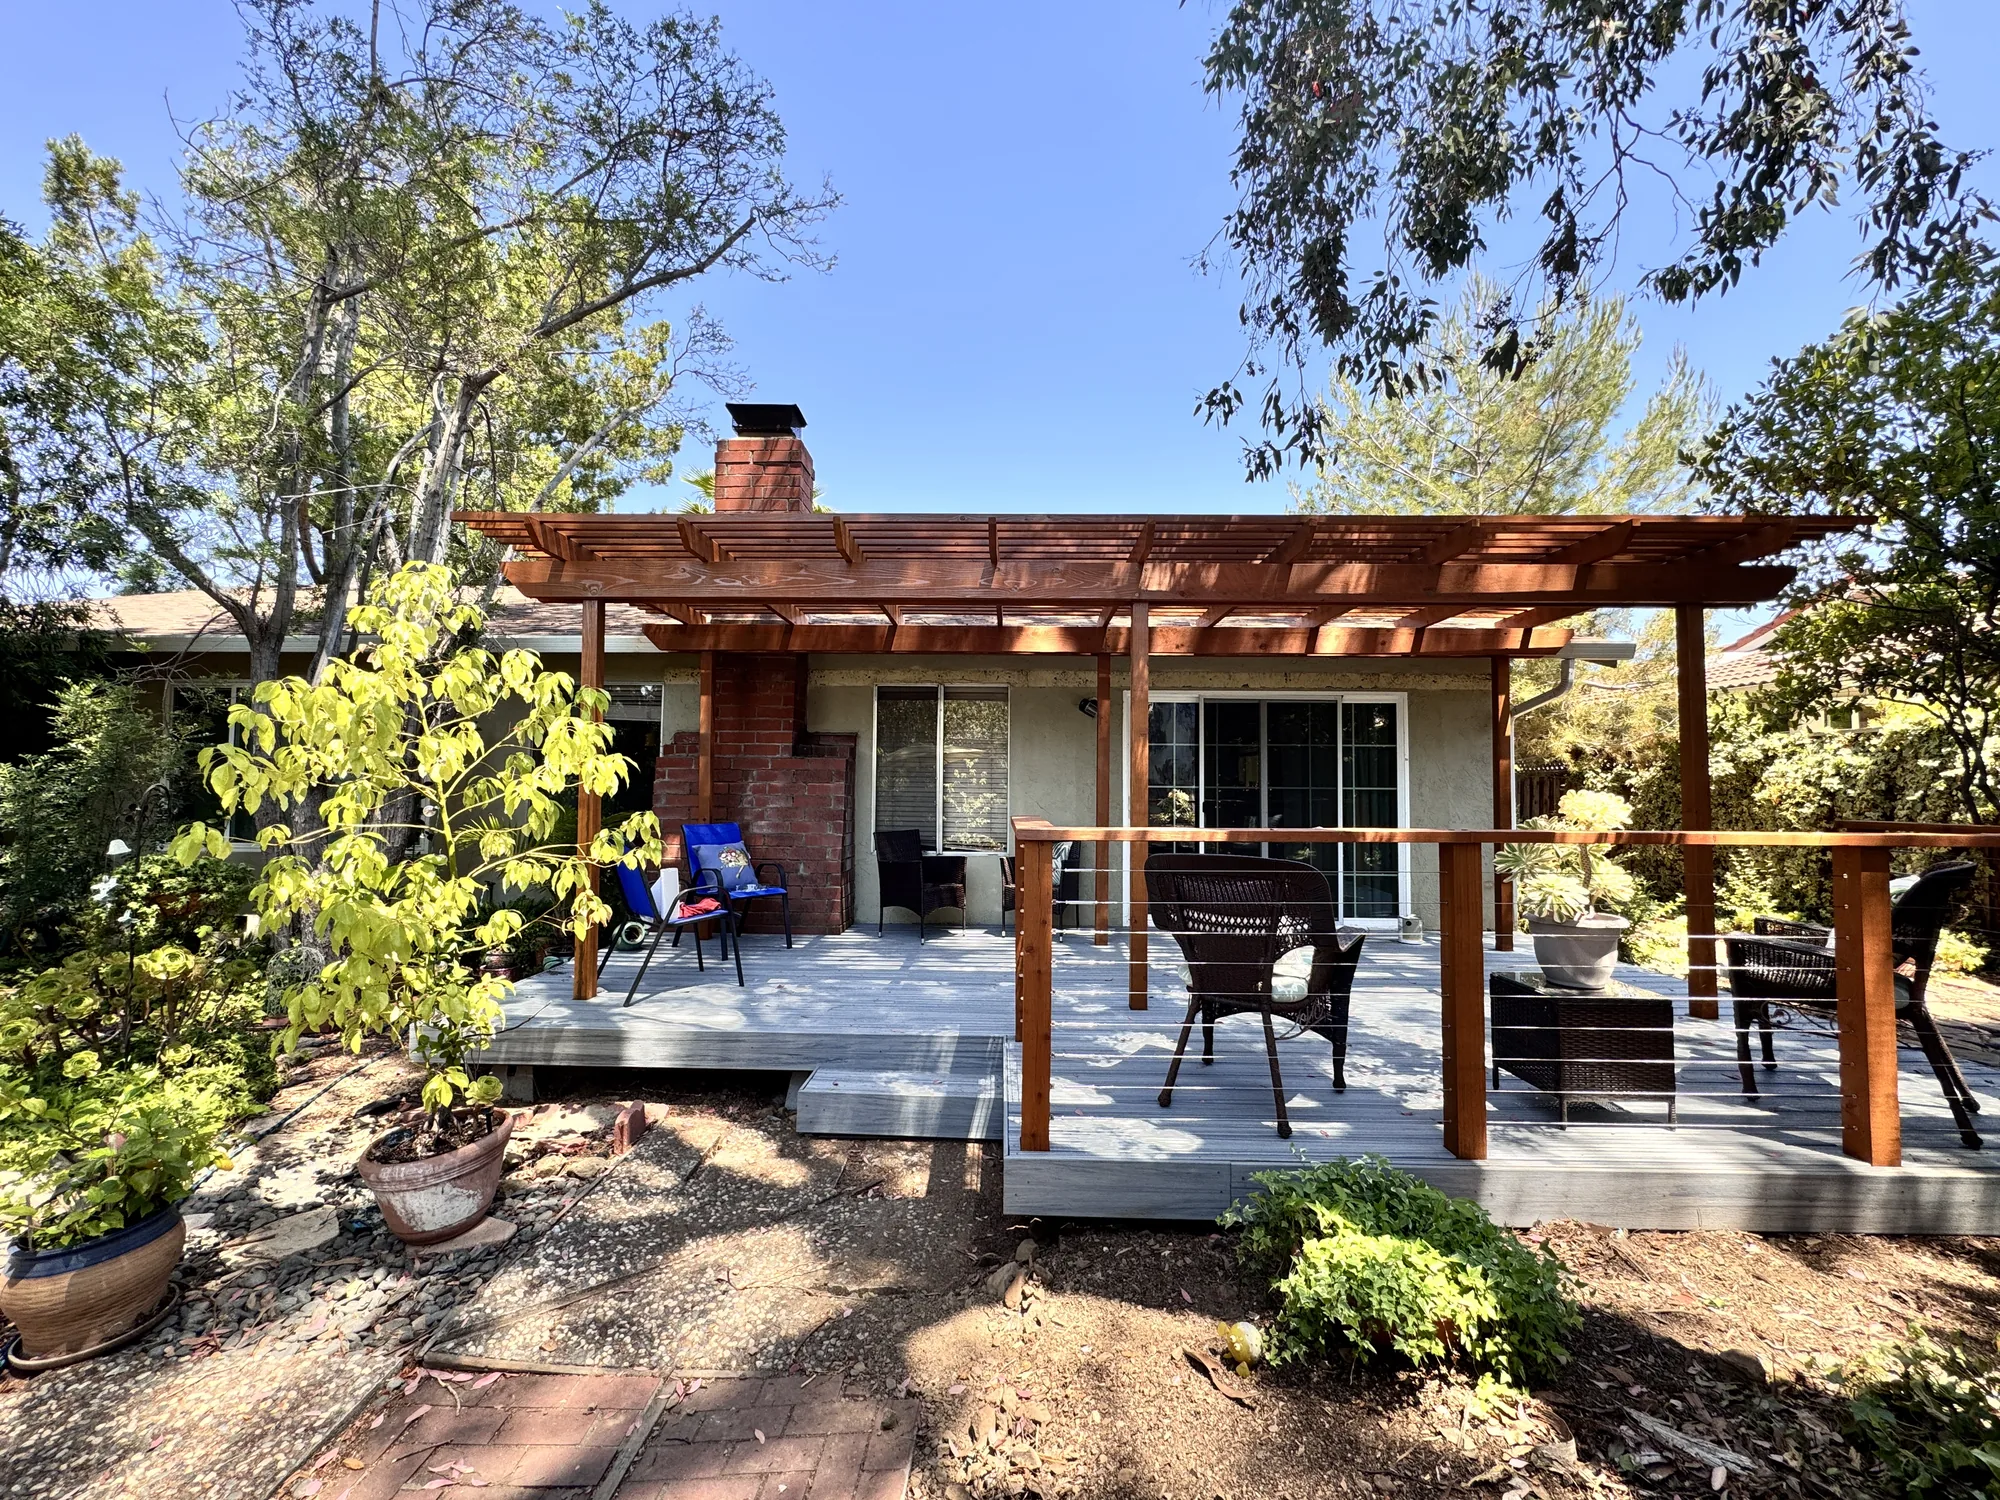
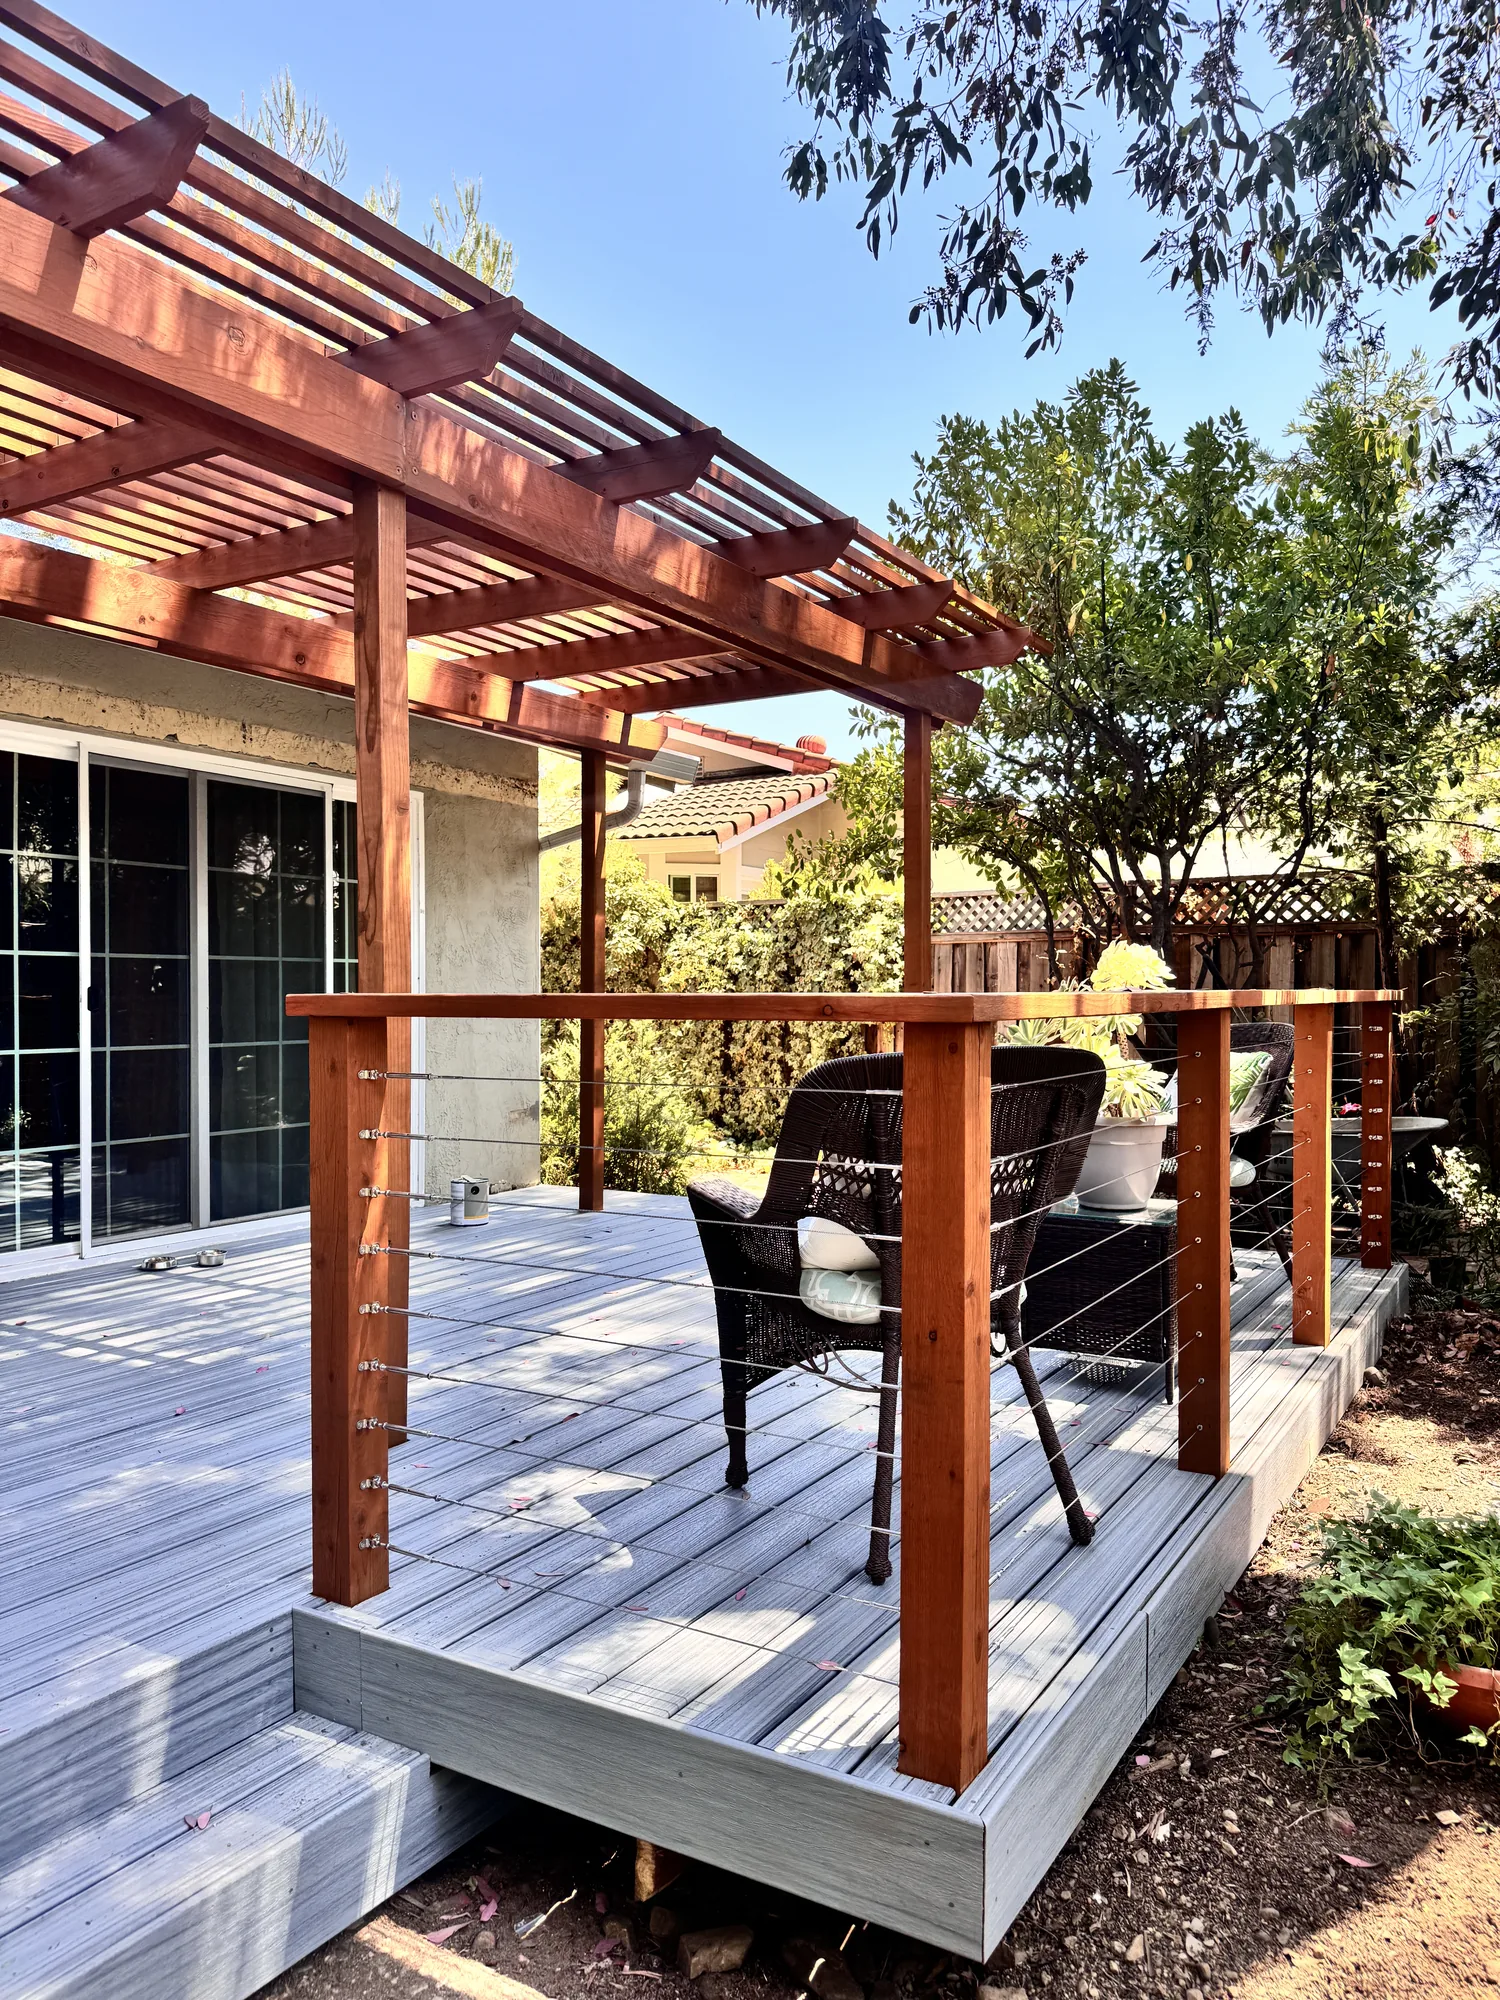
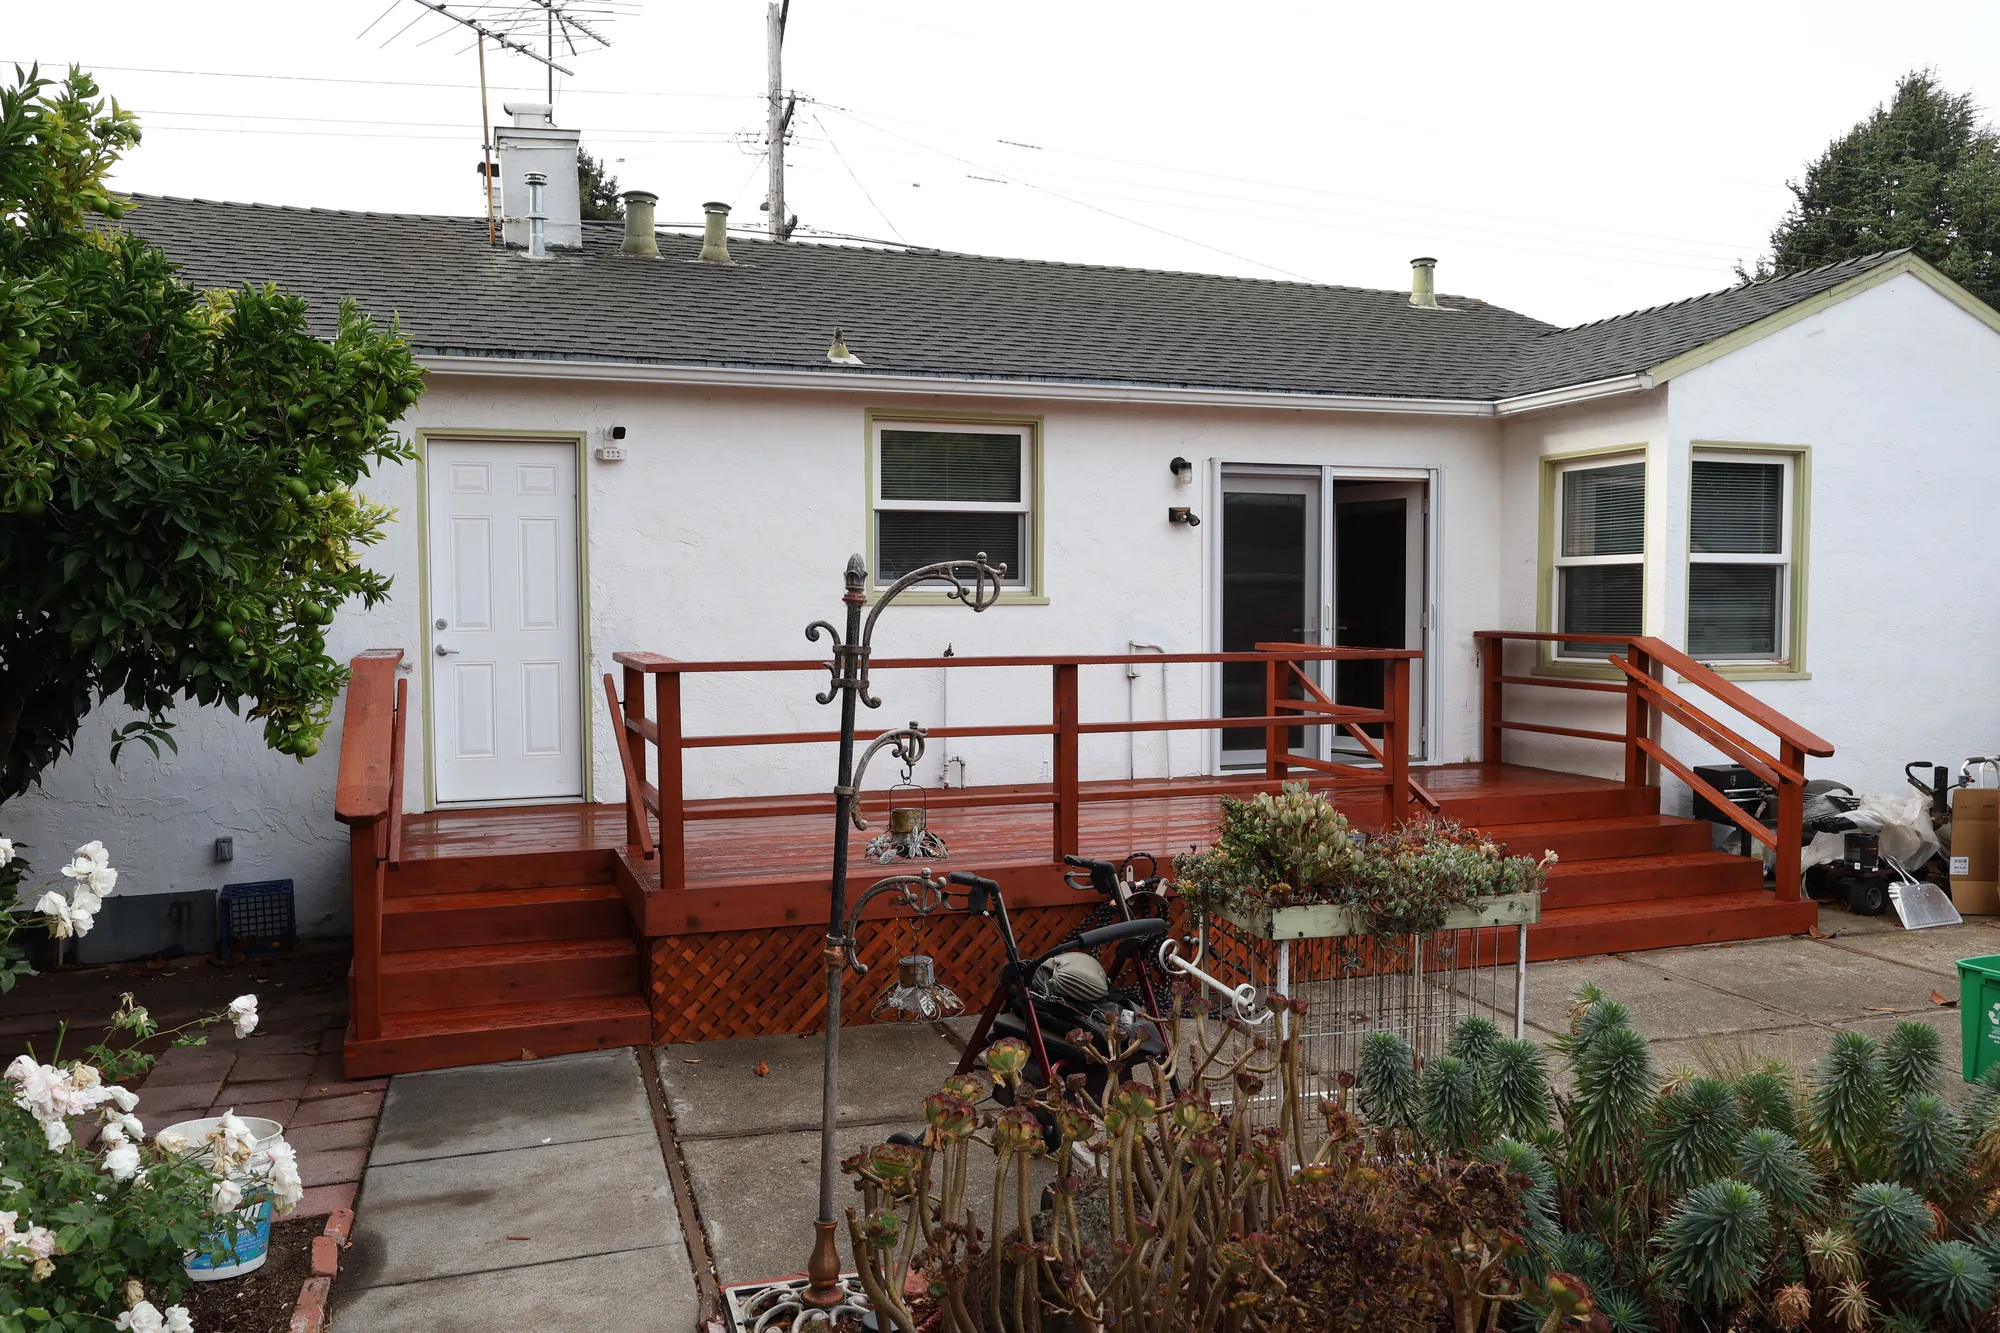
This project is a low-profile wood deck built across the rear of a single-story stucco home, connecting a sliding glass patio door and a separate exterior door to the existing concrete patio. The deck is framed in dimensional lumber and finished with solid wood decking carried in a consistent board direction, with a wide open stair on the patio side and a second set of steps at the far end. Railings are site-built from wood with a flat top cap and horizontal rail infill, with posts notched and through-bolted at the deck rim. Diagonal lattice panels skirt the perimeter to close off the crawl space beneath the framing while keeping the underside vented. The entire assembly, including decking, railings, stair treads and stringers, has been finished in a warm red-toned semi-transparent stain.
Style: Traditional

Work Completed

  • Built a low-profile wood deck spanning the rear elevation of the home
  • Framed and decked with dimensional lumber in a uniform board layout
  • Constructed a wide open stair down to the existing concrete patio
  • Added a second stepped access point at the opposite end of the deck
  • Site-built wood guardrails with flat top cap and horizontal rail infill
  • Installed diagonal lattice skirting around the deck perimeter
  • Notched and fastened rail posts directly to the deck rim joist
  • Applied a warm red-toned semi-transparent stain to all wood surfaces

Materials & Finishes

  • Dimensional wood decking
  • Wood framing lumber
  • Wood guardrail with flat top cap
  • Horizontal wood rail infill
  • Diagonal wood lattice skirting
  • Warm red-toned semi-transparent wood stain
  • Existing concrete patio and paver walkway
  • Stucco exterior wall cladding
  • Composition shingle roofing
Freshly stained red wood deck with horizontal railings across the back of a single-story white stucco house.
The completed deck runs the width of the rear elevation, linking the sliding patio door and side entry door to the backyard.
Corner view of a stained wood deck with open stair, wood handrail and lattice skirt beside a concrete patio.
The deck corner shows the stain finish carried consistently across decking, railings and skirting.
Completed Project

Covered Patio and Pergola Addition with Polished Concrete


This project added an attached outdoor living structure across the rear of a single-story stucco home, combining a solid-roof covered section with an open white pergola that extends the shade line out over the patio slab. The solid portion is finished underneath with a white plank soffit ceiling and carries a ceiling fan with wood-tone blades plus flush-mount square LED ceiling fixtures and a wall sconce beside the door, so the space is usable after dark. The pergola bay is framed with painted square columns and evenly spaced rafters and lattice slats that throw a clean striped shadow across the slab and the adjacent lawn. Underfoot is a smooth troweled concrete slab with a polished sheen, poured flush with the door threshold and carried out past the columns. Surrounding wall surfaces are finished in gray textured stucco, tied together with white vinyl sliding glass doors and windows.

Style: Contemporary

Work Completed

  • Built attached patio cover with solid roof section over the main seating area
  • Framed and installed open pergola bay with square columns and slatted rafters
  • Finished underside of solid roof with white plank soffit ceiling
  • Poured and finished smooth troweled concrete patio slab
  • Installed ceiling fan with light kit and square flush-mount LED ceiling fixtures
  • Added exterior wall sconce lighting at the sliding door
  • Applied gray textured stucco to patio-facing walls
  • Integrated white vinyl sliding glass door and windows into the covered space

Materials & Finishes

  • White painted pergola rafters and lattice slats
  • White painted square columns
  • White plank soffit ceiling
  • Gray textured stucco wall finish
  • Smooth troweled concrete slab
  • White vinyl sliding glass door
  • White vinyl slider windows
  • Bronze-finish ceiling fan with wood-tone blades
  • Square flush-mount LED ceiling fixtures
  • Exterior wall sconce
  • Wood privacy fencing
  • Artificial turf lawn
White pergola patio cover with square columns attached to a gray stucco home over a concrete patio.
The finished structure from the yard, showing the pergola bay carried on square columns off the house.
Covered patio with a wood-blade ceiling fan, gray stucco walls and a white pergola opening onto a lawn.
The shaded seating area under the solid roof section opens through the pergola bay to the back lawn.
Covered patio seating area with a white plank ceiling, ceiling fan and sliding glass door to the house.
White plank soffit ceiling with a ceiling fan, square flush-mount fixtures and a sconce at the door.
Design Direction

Lighting Techniques Worth Knowing


Good exterior lighting layers a handful of distinct techniques, and knowing the vocabulary makes the design conversation far more productive.

Path and Walkway Lighting

Low shielded fixtures that put light on the ground and keep the source out of your eyes, spaced so the pools overlap instead of sitting as isolated dots. Staggering them reads far more natural than lining both sides evenly.

Uplighting on Trees and Architecture

A fixture at or below grade aimed up into a canopy or across a facade, and the highest-impact technique available in a Pacific Northwest yard. Douglas fir wants a narrow spot while a low spreading maple wants a wide flood, and anything visible from a window needs a shield.

Moonlighting and Canopy Downlighting

Fixtures mounted high in a mature tree and aimed down, filtering through branches to cast dappled shadow across the ground. Mounting must accommodate growth with spacer hardware and generous cable slack rather than a tight strap.

Grazing and Washing

Grazing sets a fixture close to a wall at a steep angle to rake across it and exaggerate texture, which suits stacked stone and cedar shingle. Washing sets it farther back for flat, even coverage on smooth siding, so washing a textured wall flattens the exact detail you paid for.

Integrated Deck, Step, and Rail Lighting

Small fixtures recessed into risers, post caps, or under handrails to make a structure safe and legible with no visible glare source. Sequencing matters most here, since chasing wire through finished deck framing is slow and sometimes impossible.

Silhouette and Shadow Play

A fixture behind a specimen plant throws it into dark relief against a lit wall; one in front casts an oversized shadow across a fence. It works best with graphic structure such as Japanese maple, bamboo, or ornamental grasses.

How We Work

How the Work Unfolds


A typical installation moves through these stages, with the two that matter most bookending the project.

Daylight Assessment

We inventory mature trees, hardscape, grade changes, existing exterior circuits, and sightlines from your main interior windows. This is also when we find what shapes cable routing, including irrigation zones and hardscape crossings.

Evening Mock-Up

We return after dark with portable fixtures and test the actual effect on your specific trees and surfaces. Positions get adjusted on the spot, before a shovel goes in the ground.

Design and Load Calculation

Fixture positions, beam spreads, color temperature, wire gauge, transformer sizing, and control strategy go into a plan and a written estimate. Sizing with spare capacity now is what lets you add fixtures later without starting over.

Utility Locates and Permits

Underground utility locates are requested before digging, which state law requires and which costs nothing. A listed low-voltage transformer on an existing compliant receptacle typically needs no electrical permit, while adding that receptacle, a circuit, or line-voltage fixtures does.

Power Source Preparation

The transformer is mounted where it stays serviceable but inconspicuous, at proper height above grade and clear of standing water and downspout splash. Any electrical work at the source is completed and inspected before the low-voltage side is energized.

Trenching and Cable Installation

Cable is buried at correct depth, sleeved under hardscape, and routed away from root flares and likely future digging. Sod and bark are lifted and reset rather than churned, so the yard recovers in a season.

Fixture Setting

Fixtures are set, leveled, and joined with waterproof direct-burial connectors, with cable slack coiled at each location. Connections are tested before backfill closes them in.

Night Aiming and Handoff

We return after dark to aim every fixture, set the schedule, dial in dimming zones, and walk the property with you from outside and from your windows. You receive a map of buried runs and the seasonal maintenance this climate demands.

Book an Evening Lighting Walk

The fastest way to know what your property can look like is to see it lit. Call (206) 825-2773 to schedule an after-dark site visit with portable fixtures.

What You Get

What an Installation Covers


A complete project runs from the first night walk through final aiming and a written map of what was buried where.

Evening Site Walk and Lighting Plan

We walk the property after dark with portable fixtures to test uplight positions, beam angles, and path spacing. Seeing the real effect on your cedar and your interior sightlines prevents the costliest mistake in this trade, which is placing fixtures by daylight guesswork.

Low-Voltage System Engineering

We calculate connected load, size the transformer with headroom for later additions, and lay out cable as a hub or split run instead of one long series chain. Wire gauge and tap selection are set so the farthest fixture still receives usable voltage.

Trenching and Cable Routing

Cable is buried at the depth appropriate to the circuit type and routed clear of irrigation lines, root flares, and future planting beds. Where a run crosses a patio or driveway, we sleeve it in conduit rather than cutting hardscape later.

Waterproof Terminations

Every connection uses a listed direct-burial method rated for continuous wet contact, not the gel caps that ship in retail kits. Fixtures are set plumb with cable slack coiled at each location, so one can be repositioned later without splicing.

Controls, Timing, and Automation

Astronomic timers or photocell control keep the system tracking the large seasonal sunset swing here instead of needing manual resetting. Zone control, dimming, or app integration is specified up front, because it changes which transformer and fixtures are appropriate.

Line-Voltage Coordination

New exterior receptacles, dedicated circuits, and any 120-volt fixture are coordinated with a licensed electrician and permitted through the correct authority. We also check existing outdoor receptacles for GFCI protection and an extra-duty in-use cover, which wet locations require and older Eastside homes often lack.

Materials & Finishes

Fixture Materials and How They Age Outdoors


Housing material is the strongest single predictor of whether a system still works well a decade out, and the differences surface faster here than in most climates.

OptionBest ForConsiderationsRelative Cost
Cast BrassPermanent systems, fixtures in soil contactPatinas from bright gold to soft brown over a few seasons, then stops changing. Effectively immune to the ground-line corrosion that ends lesser metals in constantly wet soil.Higher
CopperPath lights, deck and rail fixtures, tree mountsDevelops verdigris quickly here, which some owners want and others dislike. Softer than brass and easier to dent, so keep it clear of mower paths.Higher
316 Marine-Grade StainlessIn-grade wells, lakefront sites, modern architectureHolds a bright finish longest in salt-influenced air near Lake Washington and Puget Sound. Lower stainless grades still tea-stain and pit, so the alloy matters, not just the word stainless.Higher
Powder-Coated Cast AluminumCost-conscious systems, wall and step fixtures kept out of soilFine until the coating chips where the stake meets grade. Once bare aluminum contacts wet bark or fertilizer it corrodes from the inside out.Moderate
Composite and PolymerBark beds, high-traffic path locationsWill not corrode and shrugs off equipment impact. UV and freeze cycling make older formulations chalk and grow brittle, and gasket quality matters more than the housing.Low
Integrated LED ModuleSealed in-grade positions where water intrusion is the threatFactory-sealed optics exclude moisture better than any field-made joint. The tradeoff is that when the module fails you replace the fixture rather than a lamp.Moderate
Replaceable Lamp FixtureUplights and accents you may want to tune over timeLets you change color temperature, beam angle, or output later without disturbing the buried connection. Depends entirely on a sound gasket and a socket that has not corroded.Moderate

Final material choice depends on site conditions and a written estimate.

Investment

What Moves the Number


Outdoor lighting has an unusually wide range, because two systems with identical fixture counts can differ enormously in what it takes to install them.

Fixture Count and Zoning

Each fixture carries hardware, labor, and a share of the cable work, so count drives the baseline more than anything else. Splitting the system into separately controlled zones adds transformer capacity and more runs back to the source.

Housing Material and Grade

The gap between a composite path light and a solid cast brass one is substantial, and it repeats at every position in the yard. Material grade determines whether you replace fixtures in five years or twenty.

Trenching and Surface Restoration

Running cable through open lawn is straightforward; running it through established beds, around mature roots, or across a slope is not. Any crossing of concrete, pavers, or asphalt requires boring or sleeving.

Line-Voltage Work and Permitting

A project living entirely on an existing GFCI-protected receptacle stays in low-voltage territory. Add a circuit, soffit downlights, or post lanterns and you bring in licensed electrical labor, permit fees, and inspection scheduling.

Tree Mounting and Elevated Work

Canopy downlighting requires climbing or lift access, hardware that accommodates growth, and cable secured up the trunk without girdling. It is among the more labor-intensive techniques to execute correctly.

Controls and Smart Integration

A basic astronomic timer is inexpensive; app-controlled zoning, dimming, and tunable color temperature are not. Controls also constrain fixture selection, since dimmable models cost more across the entire system.

No honest number can come from a photo or a phone description. Accurate pricing requires an on-site inspection of soil, existing electrical, hardscape crossings, and tree access, followed by a written estimate itemizing fixtures, cable, controls, and labor.

Why Sky Pro

Reasons Homeowners Bring Us In


Most of the outdoor lighting calls we take fall into a few recognizable situations.

Systems Designed for Wet Ground

We choose housings, gaskets, and connection methods assuming the soil will be saturated for months at a time. That single premise eliminates most of the failure modes we get called to repair.

Aiming Done at Night

Fixtures aimed by daylight are almost always wrong, because spill, glare, and hot spots are invisible until dark. We build the aiming visit into every project instead of treating it as an extra.

Load Handled as Engineering

Voltage drop is arithmetic, not opinion, and it is why so many long runs go dim and yellow at the far end. We calculate it and leave documented headroom for later additions.

Coordination With Your Exterior

We build decks, patios, pergolas, and fire features, so we know where sleeves and chases belong before a surface closes up. Lighting planned alongside those projects costs far less than lighting retrofitted into them.

Restraint With Glare and Neighbors

Eastside lots sit close together and many jurisdictions carry exterior lighting standards, particularly near shorelines. We shield sources and control spill at property lines so your yard is lit without floodlighting anyone else’s.

Documentation You Can Use

You get a map of what is buried where and what each zone controls. That keeps the system serviceable by anyone in ten years instead of a mystery to be excavated.

Client Reviews

What Our Clients Say


Common Questions

Frequently Asked Questions


Do I need a permit to install landscape lighting in Bellevue?

Usually not for the low-voltage portion itself. A listed Class 2 transformer plugged into an existing, code-compliant outdoor receptacle is generally treated as low-voltage work. What triggers permitting is adding a new exterior receptacle, running a new circuit, or installing any 120-volt fixture. Which office issues that permit varies by jurisdiction, so we verify for your address first.

Why do landscape lights fail so fast in this climate?

Water intrusion at the connection and corrosion at the ground line. The usual culprits are gel-filled wire caps never rated for continuous submersion and aluminum housings whose coating chipped where the stake meets soil. Once water reaches bare aluminum or a copper conductor the failure is progressive, typically showing up in the second or third wet season.

How many lumens do I actually need out there?

Far fewer than most people assume, and beam spread matters more than raw output. Your eyes adapt to darkness, so a modest output aimed precisely reads as bright and inviting, while an overpowered fixture creates glare with blackness around it. A tall conifer needs a narrower beam rather than a stronger one.

What color temperature should I use?

Warm, and consistent across the whole system. Roughly 2700K flatters cedar, warm wood, brick, and green foliage, which covers most properties here, while about 3000K suits grey stone, concrete, and modern architecture. Mixing temperatures across one yard makes the composition look accidental, so choose one and pair it with a high color rendering index.

Can lights be mounted in my trees without hurting them?

Yes, when the hardware accounts for growth. The correct method uses stainless fasteners with spacers that hold the mount off the bark and let the trunk expand, plus generous cable slack. The damaging approach is a strap cinched tight, which girdles the limb and kills everything above it within a few seasons.

Should I run lighting before or after building a deck or patio?

Before, without question. Sleeves under a patio and chases through deck framing take minutes while the structure is open and can be impossible to add cleanly once the surface is finished. Even if lighting is a later phase, running empty conduit during hardscape work is inexpensive insurance.

What maintenance does an outdoor lighting system need here?

Mostly lens cleaning and beam management. Moss, mineral film, and organic debris build up on lenses in this climate, especially under drip lines and conifers, and a clouded lens cuts usable output sharply. Plantings also grow into beams within a couple of seasons, so aim points need occasional adjustment.

Can I add smart controls or dimming later?

Sometimes, but deciding up front is far cheaper. Dimming and color tuning require fixtures that support it plus a compatible transformer, so retrofitting means replacing hardware rather than adding a module. Adding zones or fixtures is usually painless, provided the original transformer was sized with spare capacity.

Ready to Talk Through a Plan?

Tell us what you want lit and how you use the space after dark, and we will put together a fixture layout, control strategy, and written estimate. Reach us at (206) 825-2773.

Related Services

Further Reading From Our Team


Enhancing Home Value with Smart Home Features During Remodels

Useful background if you are weighing app control, zoning, and automation for exterior lighting alongside other connected systems in the house.

Transform Your Yard: From Overgrown Weeds to Beautiful Green Spaces

Worth reading first if the landscape needs work before lighting, since planting layout and bed edges determine where fixtures and cable runs can go.

Washington Home Remodeling: Choosing Materials That Last

Explains why durability decisions carry so much weight in a climate with sustained rain, which is the logic behind brass and stainless fixture housings.

Service Areas

Where We Install Outdoor Lighting


We install landscape, path, and deck lighting across Bellevue and the surrounding Eastside, including Kirkland, Redmond, Sammamish, Issaquah, Mercer Island, Newcastle, Bothell, and Woodinville, along with Seattle and nearby suburbs. Site conditions vary widely here, from lakefront lots with salt-influenced air to wooded hillside properties with mature conifers and steep grade.

Do not see your neighborhood? Call (206) 825-2773 — we regularly work throughout King County.

Where We Work

Serving Bellevue and the Greater Seattle Area


Our outdoor lighting crews work throughout Bellevue, the Eastside, and greater Seattle.

Get Started

Request an Outdoor Lighting Consultation


Send a few details about your property, your existing exterior electrical, and what you would like lit. We will follow up to arrange a walkthrough and a written estimate.

Appointment Request Form

Let us know how we can help you!

Click To Call